Client Resource Center

Search here: 
Clear search results
Choose a category:
Clear category choice
Thank you! Your submission has been received!
Oops! Something went wrong while submitting the form.
Fixes

Where can I find site activity log?

The Site Activity log is available for Webflow Enterprise customers and Enterprise partners only. This is unfortunate and I hope in the future this feature will be available for lower tiers.

Here's a summary of Activity Log feature from Webflow official resources.

Site Activity Log Overview

The Site Activity log allows team members to track, diagnose, and view important changes to their site, including what changes were made, when, and by whom.

When to Use the Site Activity Log

  1. Disaster Recovery: Quickly identify and fix issues caused by recent changes.
  2. Team Visibility: Gain insights into your teammates’ contributions and progress, especially useful for large teams and collaborations.
  3. Publish Readiness: Review unpublished changes to avoid publishing in-progress work, and check updates ready for production.

Tracked Activities

  • Class Changes: Includes creation, modification, and deletion of classes and their interactions.
  • Component Changes: Involves changes to components and their interactions.
  • Variable Changes: Covers creation, modification, and deletion of variables.
  • Custom Code Changes: Includes changes made in Site settings, Page settings, and HTML embeds.
  • CMS Changes: Encompasses changes to Collection items and CMS Collections.
  • Settings Changes: Includes changes to page and custom code settings.
  • Backups: Tracks backup creation and restoration.
  • Page Modifications: Includes changes to the HTML structure of a page, interactions, and static content.
  • Branch Activity: Tracks creation, deletion, merging, and review requests for page branches.
  • Publish Events: Logs publish and unpublish events.
  • Library Events: Tracks sharing, installing, updating, and uninstalling Libraries.

Activities Not Tracked

  • Descriptions of changes made to classes, components, or custom code.
  • Changes to Workspace settings.

How Activities Are Tracked

Activities are tracked when the site is saved, either manually or automatically. Most activities are view-only with exceptions for some that provide detailed insights or previews.

Filters in the Site Activity Log

  • Changes: Filter by all changes, unpublished changes, staging, or production.
  • Activity Type: Filter by specific activities like classes, components, variables, custom code, CMS, settings, backups, page modifications, branch events, and publish events.
  • Author: Filter activities by all authors or a specific author.

The Site Activity log helps teams manage site changes efficiently, ensuring visibility, accountability, and readiness for publishing.

Fixes

There is no form on my website, but I keep receiving spammy submissions. Why?

Most likely, there is a form on your website—it’s just not visible. At Rapid Fire, we’ve come across this issue many times, with clients assuring us that no Webflow forms remain on the site. However, the culprit is always the same: A form is present on one of the published pages, but it’s hidden using CSS, with the display property set to none (e.g., display: none;). This is not the same as visibility: hidden;—while the latter keeps the element in the HTML but hides it from view, display: none; removes the element visually but not from the code.

Why do bots still submit hidden forms?

Bots don’t interact with websites the same way humans do—they don’t rely on visual cues. Instead, they crawl through the raw HTML code. If a form exists in the code, even if it’s hidden from human users, bots can still detect it and submit spam through it. This is how spam content can reach your inbox, even when the form seems non-existent.

How to Identify Hidden Forms

  • Inspect your code: Use browser developer tools (right-click → Inspect) to search for form elements.
  • Check manually all pages: Hidden forms may appear on old, forgotten pages, both dynamic and static. Inspect elements on each page in the Navigator.
  • Use Style Selector tab to identify form-related classes and their locations. This approach will only work if you maintain clear and meaningful naming conventions for your classes.
Webflow applicable theory

Can I set up Open Graph image just once for all pages?

It’s impossible to set up Open Graph globally for all pages in one place natively. Besides, strategically, it’s better not to use a single Open Graph image for all pages because each page often has unique content and purpose. Using specific images for each page enhances user engagement and improves social media sharing by making the shared content more relevant and visually appealing.

For static pages, you need to add a link to the location where the Open Graph image is stored. Typically, you can easily retrieve this from the Assets pane where you upload images. For custom Open Graph images on dynamic pages (such as collection pages), you need to upload the Open Graph image to the collection in a separate field. The developer will create this field for you and connect it to the Open Graph settings.

Continue reading: Leverage OpenGraph in Webflow to Maximize Your Social Media Impact

screenshot from Webflow university with explanation
Webflow University

You can set a universal Open Graph image for all items in a collection by adding a code snippet to the <head> section of the collection template page. Ensure that the Open Graph image setting is left unset to avoid conflicts.

Webflow custom code area - openg raph image url
Setting one Open Graph for all pages in a collection

Webflow applicable theory

How Should I Treat Decorative Images on My Website from an SEO Standpoint?

Decorative images don’t add information to a page's content and are used purely for aesthetic purposes. These images are not essential for understanding the content but are often used to enhance the visual appeal or layout of a website.

Example of Decorative Images

Imagine a blog post about the best indoor plants for air purification. The post includes detailed descriptions and images of various plants like snake plants and spider plants. Additionally, there might be a background image of leaves or a subtle plant-themed graphic in the page corners. These background images or graphics are decorative because they don’t provide any additional information about the plants—they simply make the page look more visually appealing.

Example from the Rapid Fire Website

Example of decorative image on Rapid Fire website

Accessibility and SEO Considerations

From an accessibility standpoint, it’s important to give decorative images null (empty) alt text (alt="") so that they are ignored by assistive technologies, such as screen readers. Text values for these types of images would add audible clutter to screen reader output or could distract users if the topic is different from the surrounding text.

In Webflow, there is a setting that allows you to apply this empty alt text. Always use it for decorative images.

empty alt for decorative image in Webflow and on published website

SEO Audit Complications

One complication with decorative images is that some SEO audits, like those generated by Ahrefs, may flag these images as issues because they are missing alt text. After contacting support for clarification, they confirmed that they don’t differentiate decorative images from images missing alt text, so they suggested disregarding the notification.

Ahrefs support replies to empty alt tags question
Ahrefs Support Response on Empty Alt Tags for Decorative Images

Tips for Handling Decorative Images

  1. Optimize File Size: Make sure decorative images are optimized for file size to improve page load times, which is important for both user experience and SEO.
  2. Use CSS Background Images: For purely decorative elements, consider using CSS background images rather than <img> tags. This separates the visual styling from the content and makes it clear that the image is not part of the main content.
  3. Lazy Loading: Implement lazy loading for decorative images so they only load when the user scrolls near them. This can enhance page load speed.
  4. Accessibility Considerations: Ensure that removing or ignoring decorative images doesn't compromise your website's accessibility.

By following these guidelines, you can maintain a good balance between aesthetics and SEO performance.

Webflow applicable theory

Can I have a folder and collection with the same name in Webflow?

A client wanted to have some service pages dynamic (template-based and database-powered) and some static (regular pages). It was important for them to use the same subdirectory for both types of pages. For example:

  • A dynamic page: www.mywebsite.com/services/cleaning
  • A static page: www.mywebsite.com/services/grooming

Technical implementation

At first glance, this seemed achievable by having both a "Services" collection and a "Services" folder. Webflow allows you to create a folder with the same name as a collection (with only a warning about the conflict). However, in practice, if you proceed with this, the page will not be reachable after being published and will result in a 404 error.

Collection with the same name screenshot

The same issue occurs if you try to create a collection with the same name as an existing folder.

Folder with the same name screenshot

Conclusion

Although Webflow technically allows you to create a folder with the same name as a collection (or vice versa), you should avoid doing so. Pages created under these conditions will not go live. It’s better to keep all pages of one kind—either static or dynamic—to ensure consistency and avoid conflicts.

Additional Information

Can I name a page the same as the collection? It's entirely possible and won't cause any conflicts.

  • A dynamic page: www.mywebsite.com/services/cleaning
  • A static page: www.mywebsite.com/services
Website improvements

How can we track visits to our Webflow website?

To monitor visits to your website effectively, you will need to integrate a web analytics tool. One of the most popular and powerful tools for this purpose is Google Analytics. Here’s what you need to know about setting it up and what you can expect in terms of features and data accuracy.

Setting Up Google Analytics

  1. Create a Google Analytics Account: If you don’t already have a Google Analytics account, you’ll need to create one. Go to the Google Analytics website and sign up with your Google account.
  2. Set Up a Property: Within your Google Analytics account, create a new property for your website. This will generate a tracking ID.
  3. Add the Measurement ID to Your Website: You’ll need to add the measurement ID once to website setting (Integrations tab).
  4. Publish Your Website: hit Publish button for changes to go live.

Webflow, as always, did a great job of creating detailed yet simple instructions. Watch this video tutorial, and in 5 minutes, everything will be clear.

Features of Google Analytics

Once set up, Google Analytics provides a wealth of information about your website’s performance, including:

  • User Data: Number of users, new vs. returning visitors, their geographic locations, and the devices they use.
  • Traffic Sources: Insights into how users find your site, whether through organic search, paid ads, social media, direct visits, or referral links.
  • Behavior Data: Information on how users interact with your site, including page views, average session duration, bounce rates, and the flow of user navigation through your site.
  • Conversion Tracking: Setting up goals and e-commerce tracking to measure how well your site meets your business objectives, such as completing purchases or filling out contact forms.

Digital Analytics in Practice

Consider an online fitness store aiming to increase sales of their yoga mats. By leveraging digital analytics, the store can:

  • Analyze Advertising Campaigns: Identify which social media or search engine campaigns generate the most traffic and conversions, then allocate more budget to the high-performing ads.
  • Customer Demographics: Determine which age groups or demographics are purchasing yoga mats most frequently and tailor marketing messages to appeal to those segments.
  • Website Behavior Analysis: Track user behavior on the website to identify any obstacles in the purchasing process. For instance, if users often abandon their carts at the shipping information step, the store can simplify the shipping form or offer free shipping to reduce cart abandonment.

Benefits for Different Businesses

  • Fitness Bloggers: Use digital analytics to understand what type of content (e.g., workout videos, nutrition tips) drives the most engagement and tailor future content accordingly.
  • Subscription Services: Analyze user data to identify patterns in subscription renewals and cancellations, enabling them to enhance customer retention strategies.
  • Retail Stores: Collect data from both online and offline sources to create a unified view of customer behavior, allowing for personalized marketing campaigns and improved customer service.

Digital analytics not only tracks website interactions but also integrates data from mobile apps, social media platforms, email campaigns, and CRM systems. This comprehensive data collection provides a holistic view of customer behavior, enabling businesses to make data-driven decisions to enhance customer experience and boost sales.

Big Release from Webflow: Webflow Analyze

In October 2024 Webflow announced release of Webflow Analyze, a native analytics solution putting a unified view of visitor behavior into the hands of designers and content marketers. With Analyze you get access to the visitor data right within Webflow, including information on how visitors interact with specific pages on your website.

Webflow Analyze is coming with a price tag (see screenshot below, prices for month when billed yearly)

webflow analyze pricing
Website improvements

What is the difference between implementing Google maps with an API or embedding an iframe?

When implementing maps with an API versus embedding an iframe, the primary distinction lies in their impact on page loading speed and customization options.

Using an API is favored for its ability to optimize page loading times, making the overall user experience smoother and faster. Conversely, embedding an iframe is technically simpler, requiring less setup as users don't need to create API keys or manage usage limits.

However, the trade-off with iframe embedding is limited customization. With this method, we can only apply basic styling such as adjusting width, height, and borders. On the other hand, utilizing an API grants greater flexibility for customization, allowing for the application of custom colors to the map, creation of custom markers, and more detailed styling options.

Website improvements

How to Set Up Auto-Reply After Form Submission in Webflow?

In brief, as of April 2024, it's not currently feasible to set up an auto-reply directly to form submitters within Webflow. Webflow isn't designed to function as an email agent; simplicity is prioritized in its functionality. What Webflow does offer is the ability to configure single or multiple email addresses to receive notifications about form submissions. This feature essentially allows website owners to receive alerts when a form is submitted. Unfortunately, even this basic functionality has its limitations—you can't specify which email address should receive notifications for specific form submissions; it's all managed collectively. This can be highly inconvenient for websites with multiple forms, each managed by different individuals or departments.

available webflow form settings
Available form settings in Webflow

There was optimism that the introduction of logic might improve this situation. However, the only enhancement thus far is the ability to send notifications about form submissions to individuals with access to the website (such as admins or collaborators). While this is a step forward, it still falls short of the comprehensive functionality needed to effectively manage forms.

Setting up a flow with logic

Available two methods

Currently, there are two methods to enhance this process, both requiring the use of third-party tools.

The first method involves setting up a webhook using platforms like Zapier or Integromat. Essentially, when a Webflow form is submitted, a zap is triggered to send the information to an email service (such as Mailchimp or Gmail), where the auto-response can be configured. This setup can be complex and may incur additional expenses for the connector app and email service.

The other approach is to circumvent the use of native Webflow forms, despite their appeal, and instead embed forms directly from an email agent or CRM. With this setup, the receiving tool processes the information upon form submission and triggers the desired response. However, styling embedded forms can be challenging, although with custom CSS, most obstacles can be overcome.

New player is in the game

WMails allows Webflow website owners to effortlessly create auto-responses. WMails have free trial for 14 days, and the basic plan with ability to connect 1 website and 2 forms will cost $4/mo billed yearly.

In summary, while implementing auto-responses can greatly enhance user experience, achieving this functionality will likely require the utilization of third-party tools.

Webflow applicable theory

Do I need to purchase hosting, site plan or workspace plan for my website?

I understand there seems to be some confusion regarding hosting, site plans and workspaces, which can indeed be a bit complex. Let me simplify it for you:

Firstly, it's essential to know that you do not need to purchase hosting from a third-party provider. Webflow offers hosting services, which they term as a "Website Plan." This name choice reflects that their offering includes much more than traditional hosting—it encompasses features like CMS, form submissions, site search, etc. As you opt for higher-priced plans, you gain access to an increasing number of features.

Regarding the possibility of using a free site plan, it's feasible only in specific, limited scenarios. The free plan does not support connecting a custom domain and restricts you to 2 pages and 50 CMS items (which are essentially template pages for recurring content such as blogs and case studies). It also limits you to 50 form submissions over the entire lifetime of the website, among other restrictions. This plan is suitable for very basic websites without any need for additional functionalities.

A good example of how we at Rapid Fire Web Studio leverage the free website plan is through a case study in which we demonstrate the structuring of an ideal landing page. We opted not to link directly to any of our clients' actual landing pages. Instead, we combined our expertise to create a comprehensive landing page that showcases our skills. Our goal was for it to be accessible online, allowing people to browse it in real time. Naturally, we wanted to avoid the costs associated with acquiring a custom domain and a paid website plan. Thanks to Webflow's free plan, we were able to have the page up and running, effectively serving its intended purpose.

In most cases, we recommend opting for the CMS site plan, which is $23/month when billed annually (as of February 2024). This plan usually covers all requirements. The purchase can be delayed until closer to the launch date or when one of limitations is hit.

Webflow Site plan pricing
https://webflow.com/pricing

Webflow also offers workspace plans, which generally don't concern most website owners. Advanced workspace plans are tailored for those managing multiple websites and large teams. One point of confusion is that a paid workspace plan can override some restrictions of free site plans. For instance, if you have a website that exceeds the two-page limit but don't wish to purchase a site plan for it, this limitation can be bypassed with a paid workspace.

Webflow Workspace Plan Prices
https://webflow.com/pricing

To summarize, if you own one or just a few websites published on custom domains, your primary concern should be the website plans, with each site requiring its own plan. However, if you manage several websites in development (a common scenario for agencies or businesses with multiple products) and have a team involved in development and content editing, you might need to consider upgrading your workspace.

Remember, Webflow does not provide custom domains, although domains ending in .webflow.io are provided for free.

I hope this clarifies things for you. Please don't hesitate to reach out if you have any further questions.

Fixes

Why is the background video not playing on one of my devices?

If a background video is not playing on only one of your devices, it's possible that the issue lies in the settings of that device's browser. A common fix involves checking the reduced motion settings, as background videos may not play if these are enabled.

Here’s how to check and disable this setting:

On Windows:

  1. Go to 'Settings'.
  2. Navigate to 'Ease of Access'.
  3. Select 'Display'.
  4. Ensure that 'Show animations in Windows' is turned on.

On a Mac:

  1. Click the Apple menu at the top left corner.
  2. Select 'System Preferences'.
  3. Click 'Accessibility'.
  4. Choose 'Display' from the options on the left.
  5. Make sure that the option for reducing motion is not selected.

Another reasons for background video not to play include: 

  • Ad Blockers or Browser Extensions: Some ad blockers or browser extensions can block videos from playing, mistaking them for advertisements.
  • Auto-Play Restrictions: Modern browsers often have restrictions on auto-playing videos, especially if they have sound. These restrictions can prevent background videos from playing automatically. Webflow's background video element does not have a sound option, so this is almost never a problem.
  • When iOS devices have low power mode enabled background videos are disabled. This is an iOS feature to preserve battery life.

Once we asked Webflow support...

Ultimately here, it's very difficult to reliably enforce autoplay of all videos across all devices, because there are explicit, unique rules on certain devices which interfere with autoplay policies on HTML videos. This is especially common on many mobile devices, in which autoplay is disabled when the device is in low power/battery saving mode. There are also a number of different power saving and accessibility policies on operating systems and within Browsers which prevent autoplay from occurring. Ultimately, provided that the autoplay attribute is included in the source code declared for the video element, then whether the video actually autoplays is down to all of these various localised factors on the device, which are outside of your control as a website developer. - Webflow Support

What is Reduced Motion Mode and How It Helps to Enhance Accessibility

Reduced motion mode is a feature available in many operating systems and applications designed to limit the amount and intensity of motion and animation in the user interface. This mode primarily serves two purposes:

  1. Accessibility for Users with Motion Sensitivity: Some individuals experience discomfort or physical symptoms like dizziness, nausea, or headaches due to motion and animation effects on screens. This condition is known as vestibular disorder. Reduced motion settings help mitigate these effects by minimizing or eliminating animations and certain types of motion in the user interface, making the digital experience more comfortable for these users.
  2. Reduced Distractions and Cognitive Load: Animations and motion effects can be distracting for some users, particularly those with attention-related disorders such as ADHD. By reducing these effects, the user interface becomes less distracting and easier to navigate, helping users focus better on the task at hand.

Reduced motion mode often modifies or removes:

  • Parallax scrolling effects
  • Zooming, fading, or sliding transitions
  • Animated loading indicators
  • Full-screen animations and video backgrounds
  • Other motion-based interface elements

Enabling reduced motion mode varies depending on the operating system or application. In general, it can be found in the accessibility settings of the device or software. This mode illustrates the importance of designing digital products with accessibility in mind, ensuring that they can be comfortably used by people with a wide range of needs and preferences.

What are workarounds?

One popular workaround is to replace Webflow's native background video element with an HTML video element. To do this, you'll need to store your video on Dropbox, another third-party cloud service, or your own server. It's recommended to use both the autoplay and muted attributes in your video tag. While the reason for using the autoplay attribute is obvious, let me explain why the muted attribute is also important.

Using the muted attribute helps ensure that videos will autoplay because many browsers restrict videos with sound from autoplaying to prevent intrusive and disruptive user experiences. When a video is muted, it reduces the potential for annoyance, making browsers more likely to allow it to autoplay.

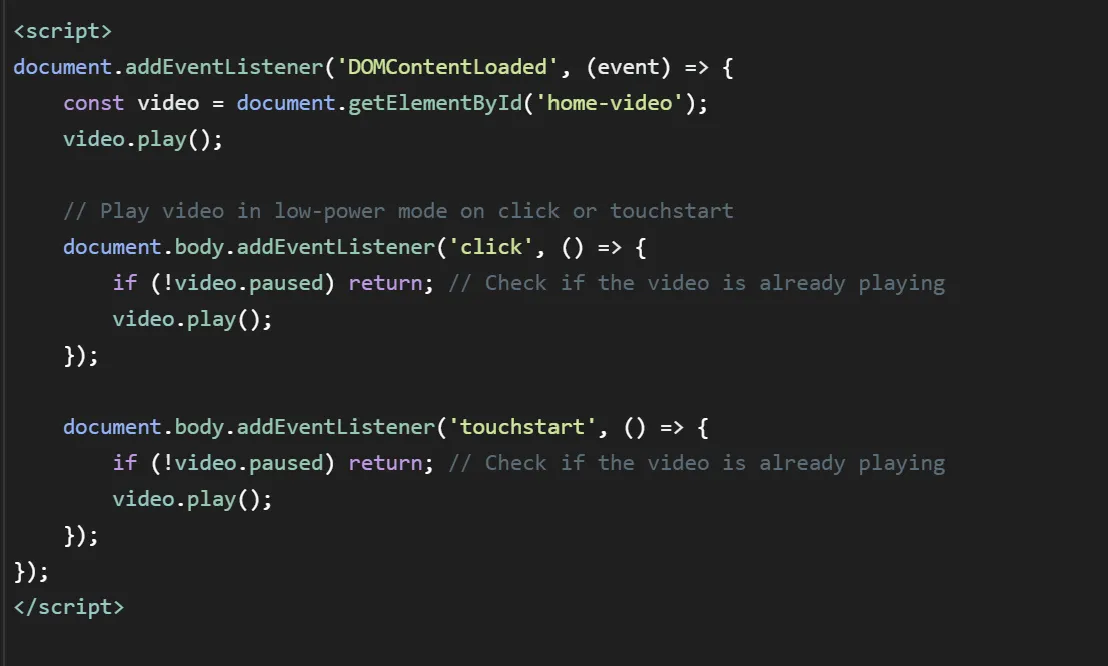
You can also add JavaScript code that ensures that a video automatically plays when the webpage loads, and also makes sure the video continues playing even if the user interacts with the page. When the HTML document is fully loaded, the script selects the video element by the ID and starts playing it. Additionally, it adds event listeners to the body of the document for both click and touchstart events. If the video pauses, clicking or touching the screen will play the video again. This is useful for scenarios where user interaction is required to initiate media playback, ensuring a seamless viewing experience.

Note: code can improve video autoplay functionality, it may not be foolproof due to external browser settings.

The Final Word from Webflow Support (And I Agree)

However, it is important to consider that utilising these kinds of workarounds may interfere with accessibility settings that visitors have set, and result in an inaccessible experience for visitors using your site. For this reason, it's generally not recommended to use these kinds of solutions, nor any other code that disregards browser/device specific settings that enforce autoplay of video in this way. - Webflow Support
Fixes

How Can I Activate Google Maps on My Website?

To activate a live Google Map on your website, you will need to provide a Google Maps API key. Here’s how you can get one:

  1. Visit the Google Maps Platform and click "Get Started."
  2. Follow the on-screen instructions to generate your API key. This process will require you to set up a billing account with the Google Cloud Platform, which I cannot do for you as it involves personal account information.

Once the API key is generated, please send it to me. I will integrate it into your Webflow project. After that, return to the Google Cloud Platform where you obtained your API key and restrict its usage. Restricting means specifying which websites (domains) the map can appear on. Additionally, ensure that the API you want to use is enabled in the property settings.

With the API key integrated and restrictions set, the map should be operational on your website.

In Webflow, I can set an address and adjust several settings, such as the map's title, tooltip, zoom level, and map type. I can also enable scrollwheel zoom and touch dragging for a more interactive experience.

Webflow map element settings

For more detailed instructions please visit Webflow University.

Webflow applicable theory

How can I add a table to a blog post or other CMS item in Webflow?

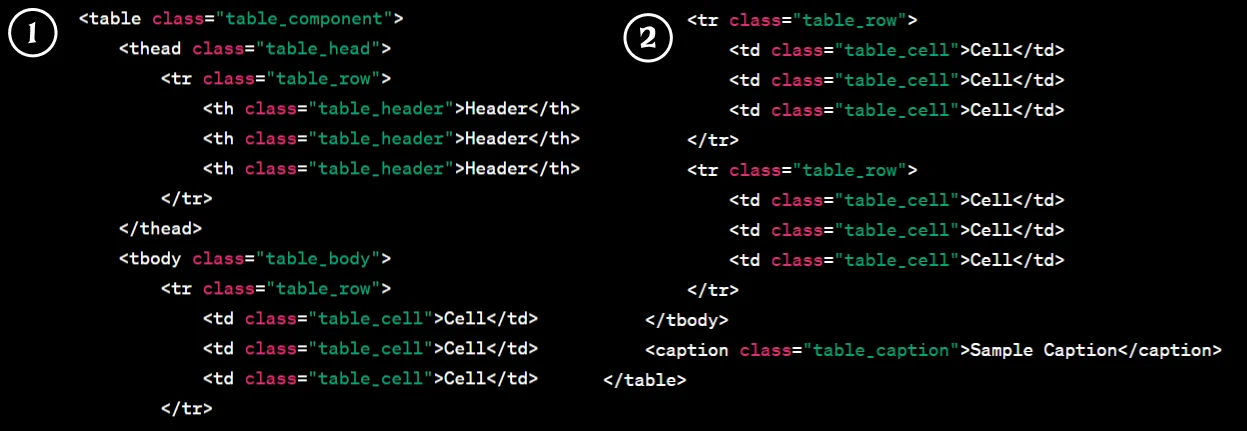
As of January 2024, Webflow doesn't offer a native feature to directly add tables to CMS items. However, it's still possible by inserting HTML code for a table into the rich text body of your blog post. The code might look something like this:

example of simple html code for table

Don't worry if you're not comfortable writing HTML code. There are several methods to easily create and insert tables:

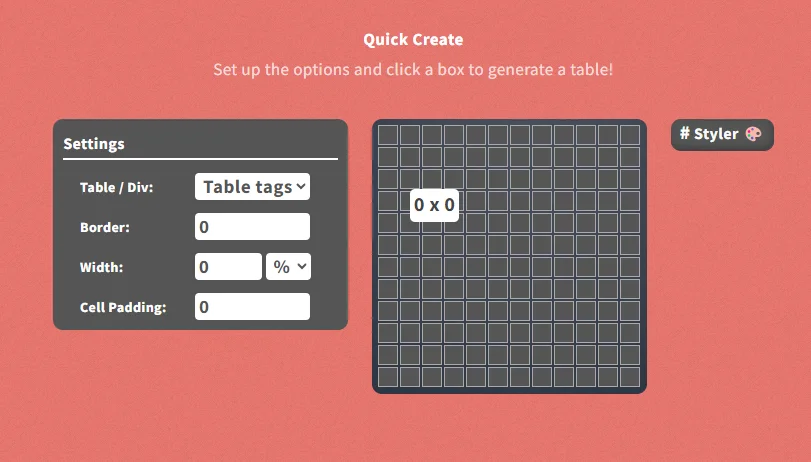
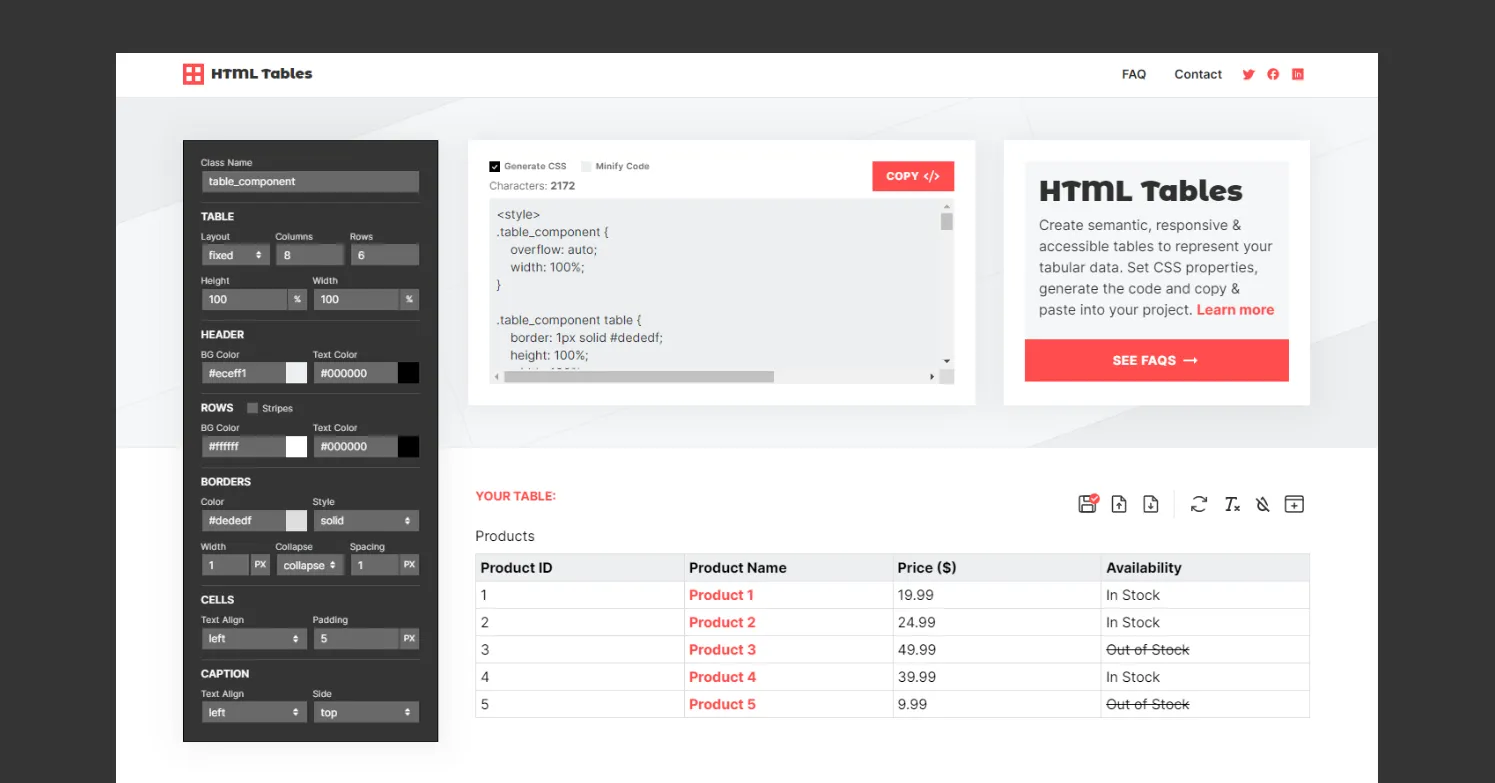
Online Table Generators: Use websites designed to generate table HTML code. You simply input your data and preferences, and the site generates the code for you. A good example is DivTable.com.

Screenshot from table generator website

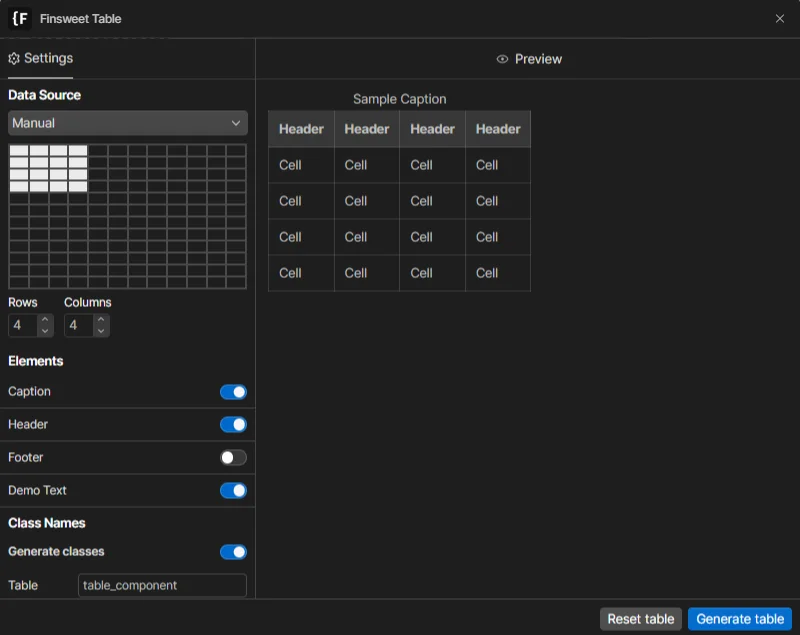
Finsweet Table App: This app lets you visually create and style a table on a static Webflow page. Once you’re happy with it, publish the page, extract the HTML code using the Inspector mode, and paste it into the rich text field of your CMS item.

finsweet table generator

ChatGPT Assistance: Provide ChatGPT with your data from Excel or a spreadsheet, and ask it to convert this into an HTML table. ChatGPT can also help with customizations, especially if you're specific about what you need.

prompt to ChatGPT about its ability to convert excel to html table

These are three methods I commonly use and recommend. When a client needs a table, I either offer to hand off the data to me for integration directly into their blog post or conduct a brief tutorial session. In this session, I explain the above methods and assist in choosing the best approach for their needs.

A Note on Mobile Responsiveness: Tables can be tricky on mobile devices. They may not fit the screen properly, become too small, or cause horizontal scrolling. To avoid such issues, always check how your table looks and behaves on mobile devices before finalizing it.

Webflow applicable theory

What should I know about redirects when considering a site move?

  1. 301, 302, and other server side redirects do not cause a loss in PageRank.
  2. Avoid chaining redirects. While Googlebot can follow up to 10 hops in a "chain" of multiple redirects (for example, Page 1 > Page 2 > Page 3), Google advises redirecting to the final destination directly. If this is not possible, keep the number of redirects in the chain low, ideally no more than 3 and fewer than 5.
  3. Avoid irrelevant redirects. Don't redirect many old URLs to one irrelevant destination, such as the home page of the new site. This can confuse users and might be treated as a soft 404 error. However, if you have consolidated content previously hosted on multiple pages to a new single page, it is acceptable to redirect the older URLs to that new, consolidated page.
  4. Keep the redirects for as long as possible, generally at least 1 year. This timeframe allows Google to transfer all signals to the new URLs, including recrawling and reassigning links on other sites that point to your old URLs.
  5. Webflow currently doesn't have a hard limit in place for total redirects, but it recommends 1,000 maximum as best practice.

Sources: Google Search Central, Webflow University

Website improvements

I would like to add a bar featuring the logos of my partners/clients. I want to ensure that all the logos are in my brand color. Can you assist with this?

Changing the color of logos can be a delicate matter. While I'm not a legal expert and cannot provide legal advice, my understanding is that if the modifications we make to the logos deviate from the official brand guidelines, it could potentially lead to issues. Major companies typically provide alternative versions of their logos with fewer or secondary colors, or even a negative version (light for use on a dark background). Adhering to these guidelines helps ensure compliance.

An acceptable compromise could be making the logos entirely white or black, although it's somewhat less than ideal. However, I would recommend against changing logo colors to match your brand color. Before we consider any color modifications, let's try to use them in their original colors. Here's an example of how a grid of colorful logos can look clean and visually appealing.

logo bar example screenshot
Website improvements

I need a cookie consent for my website. Could you incorporate one?

Certainly! I can integrate any third-party solutions you prefer, or I can add an incredibly powerful cookie consent plugin specifically designed for Webflow from Finsweet.

The advantage of the latter option is that it's free, doesn't require any monthly or yearly payments, and is GDPR compliant.

The banner users see is fully customizable, allowing us to keep it simple or have some fun with it.

Cookie consent banner example

Options

There are a couple of options to choose from. The first one is an informational cookie message (not GDPR compliant) or what's called 'implied disclosure.' This type of cookie compliance informs users that cookies will be used on the site.

Another option is 'Opt-out of cookies,' a type of cookie compliance that loads cookies by default on the user's first visit to the site. The user then has the option to either continue browsing the site with cookies or deny them. If the user chooses to continue browsing with cookies, nothing happens, and they can proceed to use the site as usual. If the user opts to deny cookies, we remove the cookies from their browser, allowing them to continue browsing the site while disabling all scripts that issue non-essential cookies.

The third option is 'Opt-in to cookies,' which is a higher level of cookie compliance. It requires the user to specifically accept the use of cookies on the site before any cookies are issued. No cookies are given until the user clicks "Accept" or a similar confirmation button. If the user accepts cookies, we activate all scripts that use cookies, and they can continue using the site with cookies. It's important to note that scripts using cookies are not loaded on the page until the user explicitly accepts the cookie message. If the user chooses to "Deny" cookies, we allow them to continue browsing the site while disabling all scripts that issue non-essential cookies. They won't receive any cookies and will maintain this status throughout their time on your website.

With options 2 and 3, there's the possibility to add a Preference Manager—a button that enables users to open the Preferences component and change their cookie consent preferences.

Preference Manager for Cookie Consent example
Preference manager for cookie consent

What is GDPR Compliance? 

GDPR compliance refers to adherence to the General Data Protection Regulation (GDPR), a comprehensive data protection law enacted by the European Union (EU) in May 2018. GDPR aims to enhance individuals' control over their personal data and unify data protection regulations across the EU member states. Here are the key elements of GDPR compliance:

1. Personal Data Protection

  • Definition: Personal data includes any information that can identify an individual, such as names, email addresses, phone numbers, and more.
  • Consent: Organizations must obtain explicit consent from individuals before collecting or processing their personal data.

2. Transparency and Information Rights

  • Right to be Informed: Individuals must be informed about how their data is collected, used, and shared.
  • Access Rights: Individuals have the right to access their personal data held by organizations.

3. Data Minimization

  • Organizations should only collect data that is necessary for their specific purposes and not retain data longer than needed.

4. Data Security

  • Organizations must implement appropriate technical and organizational measures to protect personal data from breaches, loss, or unauthorized access.

5. Data Breach Notification

  • In the event of a data breach, organizations are required to notify the relevant authorities and affected individuals within 72 hours if the breach poses a risk to individuals’ rights and freedoms.

6. Data Protection Officer (DPO)

  • Certain organizations are required to appoint a Data Protection Officer to oversee GDPR compliance and act as a point of contact for individuals and authorities.

7. International Data Transfers

  • Organizations must ensure that any transfer of personal data outside the EU complies with GDPR requirements, typically ensuring adequate levels of protection in the receiving country.

8. Penalties for Non-Compliance

  • Organizations that fail to comply with GDPR can face significant fines, up to €20 million or 4% of their global annual turnover, whichever is higher.
Webflow applicable theory

What are your recommendations on creating SEO-optimized titles and meta descriptions?

Here's a concise guide on creating SEO-optimized titles and meta descriptions for web pages:

Titles:

  1. Keyword Placement: Include your primary keyword near the beginning of the title to signal relevance to search engines.
  2. Length: Keep titles between 50-60 characters to ensure they display well in search results.
  3. Clarity: Craft titles that clearly convey the page's content, ensuring it matches user intent.
  4. Uniqueness: Avoid duplicate titles across your site; each page should have a distinct and relevant title.
  5. Brand Consistency: If applicable, include your brand name consistently in titles for brand recognition.

Meta Descriptions:

  1. Relevance: Summarize the page content concisely and ensure the meta description aligns with the user's search intent.
  2. Length: Aim for 150-160 characters to provide enough information without being truncated in search results, but realistically try to stay within the limit of 300 characters.
  3. Call to Action (CTA): Encourage clicks with a compelling CTA, prompting users to take action.
  4. Keyword Inclusion: Incorporate relevant keywords naturally, but avoid keyword stuffing.
  5. Snippet Appeal: Craft meta descriptions that entice users to click by highlighting unique selling points or key information.

Here's an example for a fictional webpage about "Healthy Smoothie Recipes":

Title:" Healthy Smoothie Recipes for a Refreshing Boost | SmoothieLand INC."

Meta Description: "Discover a world of flavor and wellness with our curated collection of healthy smoothie recipes. From antioxidant-rich blends to energy-boosting concoctions, find the perfect sip to kickstart your day. Dive into our easy-to-follow recipes and elevate your nutrition journey today."

Website improvements

I want to add a blog to my corporate website. What should I consider?

When it comes to adding a blog to your website, you've got two options: the "kinda-sorta method" or the comprehensive approach. If your aim is to get people subscribing to your blog updates, sharing your posts in the media, and actively clicking on the links you incorporate, then the comprehensive path is the way forward. Here are the key steps to follow.

  • Keyword Research: Conduct thorough keyword research to identify relevant topics and phrases that your target audience is actively searching for. Find keywords with high search volume and low competition, and strategically incorporate them into your articles.
  • Content Creation: Craft high-quality, informative, and engaging content that directly addresses the needs of your audience. While AI-generated content can be utilized, it's essential to ensure that it maintains a human touch, preferably curated by experts.
  • On-Page SEO Optimization: Implement on-page SEO strategies to enhance the visibility of your blog posts in search engine results.
  • Internal and External Linking: Include internal links to other pertinent blog posts on your site. Integrate external links to reputable sources to bolster the credibility of your content. While internal linking may seem straightforward, it can be challenging without maintaining a detailed blog post tree to identify suitable interconnections.
  • Visual Assets Creation and Optimization: A compelling blog should always incorporate visuals. Aim for a variety beyond stock photos or AI-generated illustrations, including infographics, charts, graphs, and maps. Optimization should encompass image compression and the addition of descriptive alt texts.
  • Social Sharing: Implement share buttons to facilitate the easy sharing of your blog posts by readers.
  • Social Media Integration: If your company has a social media presence, it's highly beneficial to share your blog posts on those platforms. If not, it is advisable to create accounts and commit to regular sharing to enhance visibility.
  • Schema Markup Incorporation: Integrate schema markup to provide search engines with additional context and improve the presentation of your content in search results.

If you're looking for a hassle-free solution, Rapid Fire can assist you every step of the way, providing a turn-key service to establish a robust and engaging blog for your business. Alternatively, if you already have a blog and are seeking improvements, I can help implement changes to ensure its vitality and continued success. Feel free to reach out for a quote.

Continue reading: Straightforward Strategies for Crafting Impactful Blog Content and Building Authority

Website improvements

Can I display items from my Collection in a random order?

Absolutely! Webflow makes it easy to showcase items randomly. When you add a collection (database) to a page, you'll find "random order" as one of the sorting options.

Keep in mind that different types of content may warrant different sorting methods. For example, news articles might be sorted by date, products by popularity or relevance, and team members by seniority or department.

Here are some situations where random sorting can be beneficial:

  1. Voting or Contests: In scenarios where users are voting on options, displaying entries in a random order helps prevent bias towards items listed at the top or bottom. It ensures a fair chance for all entries to be considered.
  2. Showcasing Diversity: If you want to showcase a diverse range of content on each visit, random sorting can be effective. This is common in features like "Recommended for You" sections where the goal is to expose users to a variety of options.
  3. Featured or Spotlighted Content: When highlighting featured or spotlighted content, using random sorting can give each item an equal opportunity to be prominently displayed. This is particularly useful for promotions, special offers, or showcasing a variety of products.
  4. User Engagement and Discovery: Random sorting can enhance user engagement and encourage exploration. Users may find it more enjoyable to encounter different content each time they visit, creating a sense of novelty.
  5. User-Generated Content: Platforms that rely on user-generated content, such as forums or community-driven websites, can benefit from random sorting to provide equal visibility to different contributions.

It's important to note that Webflow caches your site pages on a Content Delivery Network (CDN) for faster loading times. Because of that the random sort on published sites will refresh approximately every 12 hours. On the positive side, this ensures consistency, as everyone viewing the site during that time frame will see the same random order.

Website improvements

Can I selectively hide specific pages of a collection from Google search?

Absolutely. While Webflow doesn't provide native support for this feature *(updated, see below), it can be set up. Once configured, you'll have complete control over which pages are discoverable by Google and which ones are not.

Website owners and marketing teams often choose to hide certain pages from Google for SEO purposes. This strategic decision allows them to prioritize which pages search engines crawl and index. By excluding non-essential pages, the focus can be on optimizing key pages for better search engine visibility.

Although there isn't a dedicated button for this option, the setup process is relatively straightforward. Once configured, the maintenance is manageable, providing a means to ensure that only the most relevant pages are exposed to search engines.

UPDATE: in 2024 Webflow added Sitemap indexing toggle to static page settings. Pages with indexing disabled this way will not be included to site's sitemap. You can only disable indexing with the toggle if you’ve enabled your site’s auto-generated sitemap.

The Sitemap indexing toggle adds <meta content="noindex" name="robots"> to your site page. This prevents the page from being crawled and indexed by search engines.

You can choose to publish or unpublish all template pages belonging to a single Collection. However, there is currently no native option to select and exclude specific pages from a Collection without affecting the entire template. This option is only available if you don’t need any template pages for the Collection. The toggle can be found in the Collection Template page settings.

Publish settings for a collection template page
Website improvements

My blog's content is growing steadily. What options do I have to enhance the user experience, aside from using pagination?

Pagination is a widely used method for dividing lengthy blog pages into smaller, more manageable sections. It's also a default feature provided by Webflow, making it quick and easy to implement and style. However, when exploring custom code options, you'll find more modern alternatives that can offer an improved user experience.

One such option is the "Load More" button. With this approach, content is loaded when the user clicks a button located just below the visible content, all without changing the URL.

Another alternative is the "infinite scroll." In this setup, new items are loaded onto the page automatically as the user reaches the bottom. Infinite scroll seamlessly provides more content as the user scrolls down, eliminating the need to click through separate pages. This not only keeps users engaged but also encourages them to explore more content.

For more information read this article: Pagination and Its Alternatives: Use Cases and Best Practices

Webflow applicable theory

How does Webflow's automatically tracked Published Date for CMS items work?

There is some confusion regarding Webflow's automatically tracked Created, Modified, and Published dates. Following common logic, some of my clients assume that sorting items in the blog feed, for example, using the automatically created Published date is a good idea, but very soon they discover that it's not. Essentially, Webflow's internal published date does not reflect the date an item was first published; it reflects the most recent date it was published. In this case, let's say you updated your article (it can be a significant update or just spotted and removed a typo) once the article is pushed live; its published date is also updated. If the blog sorting relied on that date, the old article will be moved to the top.

Take a look at this screenshot to gain a better understanding.

Webflow CMS item view in a dashboard - screenshot

I created this article on September 29th, then I published it on October 10th. Later, on November 2nd, I noticed a typo and fixed it. However, I haven't published the article yet, so the status is "Staged Changes." Once I push it live, the publish date changes to the date when the article goes live.

It's not an oversight or a bug on Webflow's part. There is a reason for tracking changes like this. Perhaps the user interface could be improved to reduce confusion, but it is what it is. If my client wants to have full control over item sorting based on the date, I usually implement a custom date field for the collection and set up sorting based on it. This way, my client has automatically tracked data for internal tracking and a fully modifiable date field for sorting and display.

Webflow applicable theory

Where can I store my video files if it's not YouTube or Vimeo?

Webflow's built-in Video element is compatible with a variety of sources, including:

  • DailyMotion
  • Kickstarter
  • TED
  • Wistia
  • Ustream
  • Livestream
  • Twitch
  • Tudou
  • Hulu
  • SproutVideo

Alternatively, you can store your videos on cloud storage and file-sharing services such as Dropbox and Google Drive, or virtually any online file storage that allows you to generate a public link to the file. In such cases, you won't be utilizing Webflow's native Video element; instead, you'll incorporate a video player using HTML code.

Website improvements

I want to add video testimonials. What are my options within Webflow?

Webflow provides a couple of native options worth implementing.

Before choosing the layout for video testimonials it's important to decide whether you want it to be a lightbox or an on-page video.

In the case of a lightbox, when a user clicks on a thumbnail image, a lightbox overlay will appear on the screen, dimming the background content and highlighting the selected image or content. This allows users to view the content in a larger size without leaving the current page. Additionally, we can link all video testimonials so that users can seamlessly navigate within the lightbox view.

On the other hand, with an on-page video, the video starts to play whenever the user clicks on the play button in the video player. You can store video on YouTube or Vimeo.

This is a good example of minimalistic lightbox solution:

minimalistic video testimonials grid

And this is a good example of minimalistic on-page player implementation:

video testimonials example play on page

If I'm not aiming for a minimalistic approach, I prefer videos that incorporate quotes, similar to the one below (lightbox). Well-crafted text context can pique users' interest and encourage them to watch the video. It serves as a teaser or introduction, drawing users into the content. Users often make decisions based on text information. When they read a brief description or testimonial content alongside the video, they can quickly decide if the content aligns with their interests or needs, improving their decision-making process. This option is also good for the Homepage or About Us page.

video testimonials example with a quote

And here's example with on-page player:

video testimonials with quotes from website dreamstudiocourse.com

When deciding whether to go with a lightbox or a player, remember that you'll need to create a thumbnail image for the lightbox that matches your page or brand's vibe. This means investing a bit more time and effort. Your thumbnail can be a simple screenshot from the video or something cool you design yourself. Check out this example with clean headshots in a matching style:

video testimonials grid squares
Website improvements

I want to have a background video in the header of the page. What should I consider?

Great idea! A background video can immediately capture visitors' attention and create a visually engaging experience. It adds dynamism and vibrancy to the page, making it more attractive and memorable.

  1. The video must be smaller than 30 MB in one of the following formats: webm, mp4, mov, or ogg.
  2. The background video can't have sound; it's essentially a moving picture. If you want something with the ability to turn the sound on, I can do it, but it will be an entirely different thing.
  3. Considerations for colors and content: There will be text overlaying it, and the text should remain readable. I can apply a color overlay over the video. It's important to strike a balance between text readability and video visibility.
  4. In most cases, it will not scale nicely on mobile. Usually, a separate video for mobile is created.
  5. The video in the header will slightly slow down the initial page load and the first page print, although not tremendously. But it will still have an impact.

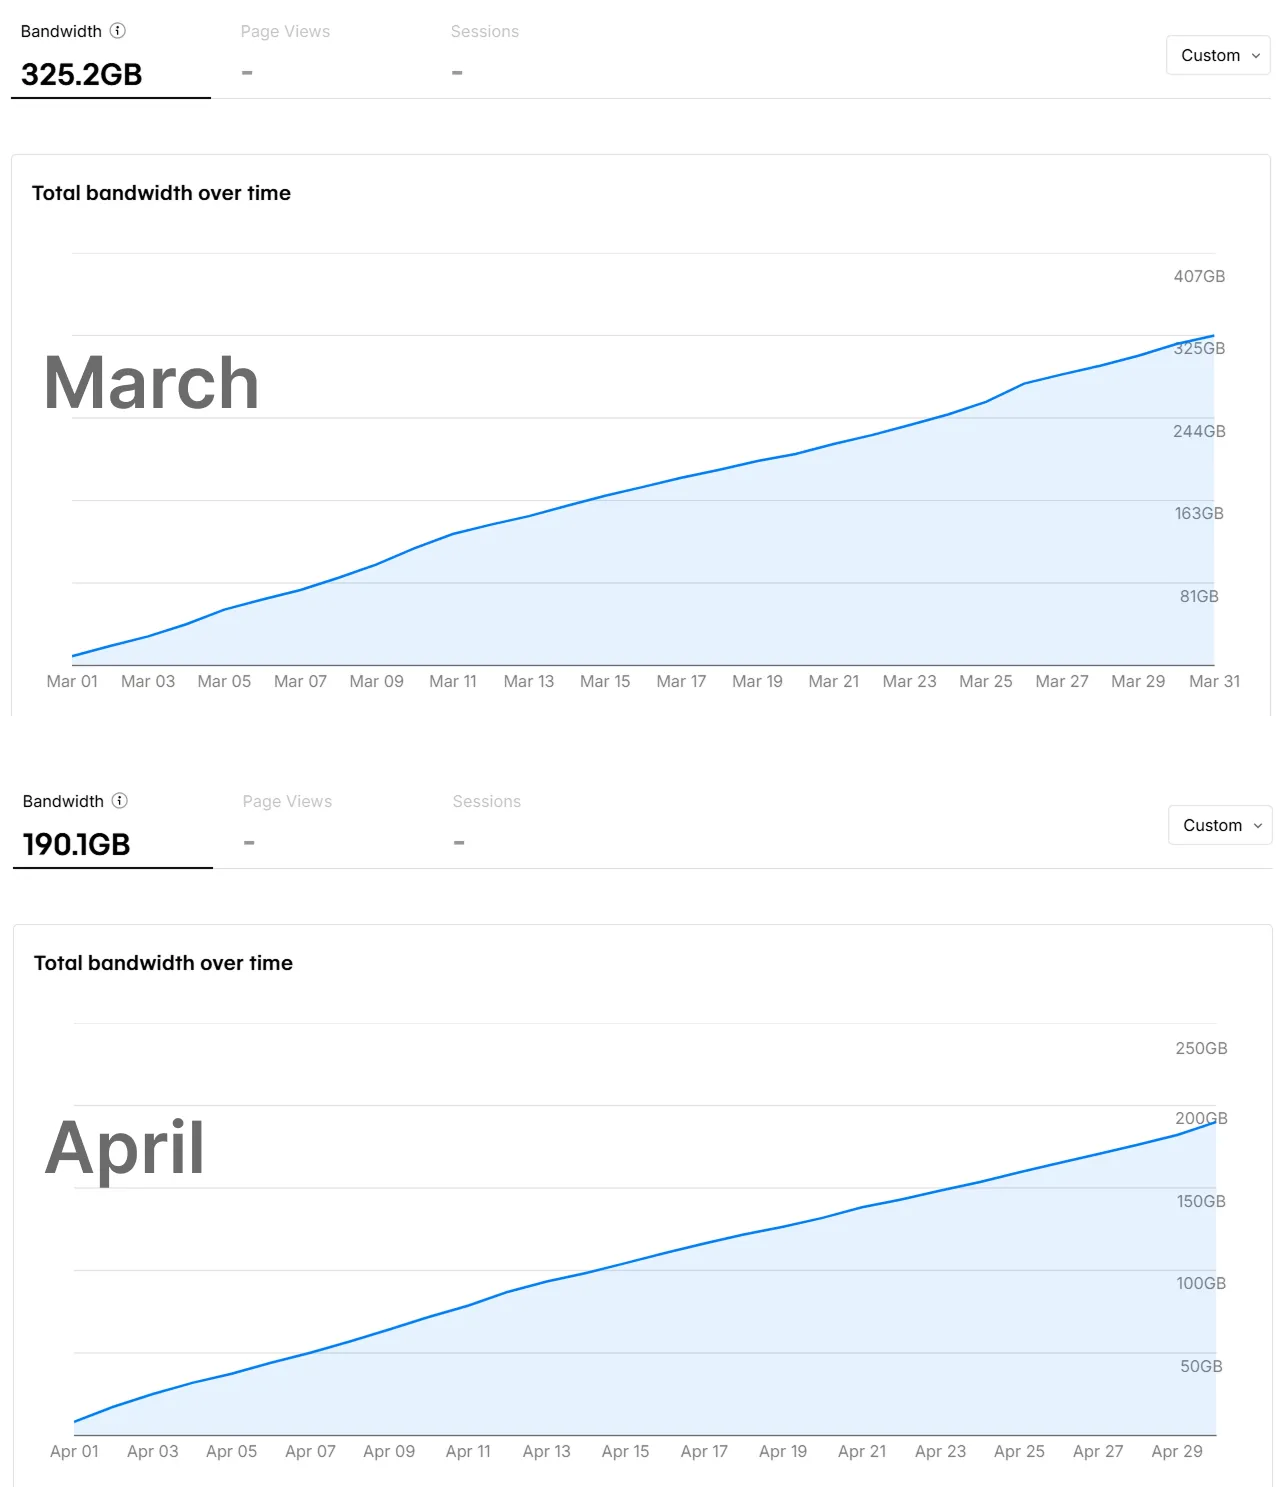
Background videos can impact bandwidth usage on a larger scale than regular videos. If you’re struggling to stay within a specific limit, you may need to reconsider using a background video. For more information on bandwidth usage, check out this article: Bandwidth Usage Optimization for Webflow Websites

Webflow applicable theory

How do I set order to FAQ items?

We totally can implement a customized sorting order for your needs. It needs to be done in Designer.
Typically, I'd suggest adding a number field to the FAQ collection and labeling it as "Custom Sort Order". Once you've assigned numbers to each item, you're free to decide whether you want the lowest numbers to show up first or the highest – totally your call. To keep things versatile and adaptable, I usually kick off the numbering with 0.
Check a screenshot. The "Test" item will slip in between items numbered 50 and 60.

setup of sorting order in Webflow CMS
Sorting order setup example

You could also go with whatever system that works best for you. Maybe you want to go with numbers from 1 to 9, and you can use the same number for multiple items. If you do that, the items that share the same number will show up in the order you added them. I had a client who wanted dates assigned to each item. We sorted stuff based on those dates. They found it way easier to manage. And hey, you can also sort by switch fields. Like, create a field called "Most Important" and when that switch is on, the items with it on will pop up first, in the order you added them.

Fixes

Why is this image flipped on its side? In the editor its in the correct position.

Webflow removes the EXIF data that determines image orientation while generating responsive images. It happens especially with pro-quality shots.

For a deep dive into the technicalities of this issue, check out this article.

Fixing it is actually pretty simple: just open up the image with image editing software and save it again. I usually do this with Photoshop.

Flipped image example